

I’ve started this blog in February 2015. And from the day one, one of my major issues is how to take good pictures of my miniatures.
At very beginning, I had at my disposal only old compact Canon camera. And it was disaster – there was no chance to take proper miniature photos with this piece of crap. The only good thing I could say about this junk – it was pink. Yeah, nice pink colour – my wife really liked this:).
…and the moment for starting miniature blog was kind of unfortunate. During that time I was staying in Puerto Viejo in Costa Rica (almost a month there), and believe me, while this coastal Caribbean town is absolutely stunning (sun, sea, sloths and stuff;), there is not many stuff to buy, if you want to improve your photography skills (I mean: buy better equipment).

One of the first photos made for my blog – Puerto Viejo, Costa Rica. February 2015 (actually – I remembered it looked much, much worse;)
Luckily, we already have some saved cash for better camera, and the only issue was – finding the store with adequate hardware…
The opportunity arrived when we moved to Mexico City, were there are generally plenty of everything – and electronic or camera stores are common. So, with little help of our close friend Javier, who is very talented photographer, I’ve bought Canon EOS Rebel T5i, and it was one of the best purchases that I’ve done.

Canon EOS Rebel T5i. Good purchase, That’s what it is:).
No, really – I was so amazed with the quality of pictures – it was like – wow, is it even possible to make such sharp, detailed photos? That was my first impression.

New Canon worked miracles! Iguana from Huatulco, Mexico (March 2015).
However, when I started tor try to take photos of my miniatures, I find out that the world of macro photos is not that nice and easy like it seemed.

Beware of latest invention of Clan Skryre. Skaven Weapon Team – Ratling Gun! – Not, very satisfiying photo. Not, at all. Time for training!
So, my training began.
I used only auto mode at first. Auto focus, ISO, aperture and shutter. For background I simply took piece of white paper. Light was tricky from the beginning – back then I did not have any clue how important it is. I was choosing the place, which in my opinion have the proper lightning and if it was too dark I was helping myself with the flash. The rest was Photoshop work.
…but, what the hell? Every bloody time I was unsatisfied. Even more – I felt little bit disappointed and angry. I just could not get how to set the proper conditions for take awesome miniature photo.
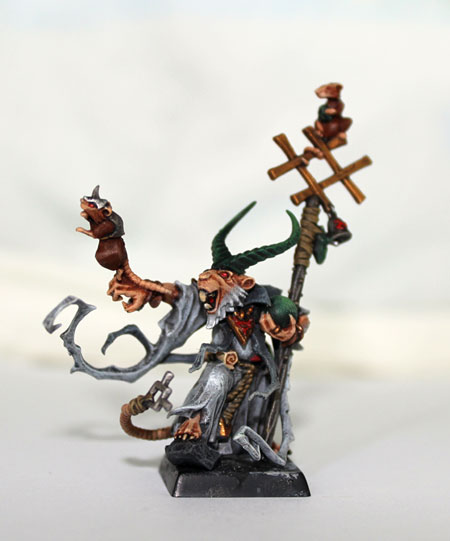
Die-die! Man-things! Grey Seer – better, but still not it…
Of course I could take the tutorials and learn how to do it – but you don’t have no idea how impatient I am. At the first sign of failure, I have tendencies to give up easily:) (look at me – and I’m painting miniatures. Talking about impatience;).
Besides, at that time, I was finding my photos at least decent quality. One of great advantages of my travelling lifestyle, when for the most of the time I’m in tropical area – the sunlight is really strong. So, I did not have to worry about light. So, there I was – making photos on auto mode, using flash – happy with myself and won’t willing to change.
The problems began in May when I was back to Poland… It turned out that tropical sun is awesome. Strong white natural light worked perfectly for making miniatures photos, but in Europe the situation is not looking that rosy.
Poland – the country where most of the time is raining or at least sky is covered with clouds. I could have dreamt about clear blue sky with long awaited sun, but it is happened not very often… My photos looked terrible – nothing was working. Even Photoshop failed me. The light just was too weak. And I, beginner amateur photographer, was desperate to make good photos. So I was, in this way, whether I liked or not, forced to improve my skills. It was the time to buy some more stuff (neverending miniature collector struggle;).

Lady Ellendeanne, Wolsung Skirmish Game. One of the first photos taken in Poland…
After quick internet research and few tips from my hobbyists friends, I’ve decided to acquire light box, new lamp (also for painting) and tripod for my camera. They seemed to be absolutely necessities, if I want to jump on the next photo shooting level.
…and it really happened. First, I read and followed the instructions from tutorials available on Cool Mini or Not. Especially, this article I found helpful. Adjusting ISO, White Balance, Shutter and Aperture – this were my first steps. Next – manual focus. Tricky, but crucial part.

Clan Eshin Skaven Assassin. One of the first photos made made in lightbox, using tripod and proper lamp.
After series of trials and errors I managed to overcome the issue and slowly I was becoming content with my photos. All thanks to simple clues available here and there. It turned out – it was no secret exclusive lore for members of inner circle. Quality of my photos improved significantly. As well as my mood. This was something I needed a lot. Finally my miniatures looked as in real life. Hooray for me!
From June until October 2015, when I was living in Poland, I’ve been gaining new experience levels at photography. Still, there were many things to improve, many things to change for better, but everything worked smoothly according to plan.
Well, in October I hit the road again and one of my major concerns was how could I make a use of my new acquired skills. Destination: South-East Asia.
I use only manual setting these days. My major concern was, if I will be able to adapt this during my travel. When I was travelling across Central America, I was auto setting photographer. This time, there was no chance I fill go full auto – I was determined to figure out how to use manual to get the best effect.
Well, the thing is I got used to what I have back home in Poland, but I was forced to switch my mind-set and develop rather DIY rules of photography – depended of the temporary conditions, I needed to bend, do not complain and take what I got.
Let’s take a look at my settings.
First – ISO (level of light sensitivity) – set on 100. As I hoped to get lots of sun light, ISO has to be low. This provides me high number of details on the photo.
Then, Aperture – the highest possible (F29 or even F32). Aperture allows control of too much light, but provides greater depth of field, making sure that some elements of mini are not blurry.
To increase sharpness of the photo even more I need to adjust Shutter setting – exposure time. We don’t need this too low, or too high – this is matter of trials and errors – we don’t want to make photo too light. The best effect is when it’s little bit darker than we see it in real life. In Poland my Shutter set was around 2.2-2.4. Right now in Asia, Shutter setting is lower – my last photo – Skaven Plague Priest taken in Koh Chang, Thailand has 1.3 Shutter with F32 Aperture. The thing is, with this settings, Camera need to be well stabilised in order to take proper photo. Which leads us to next point.
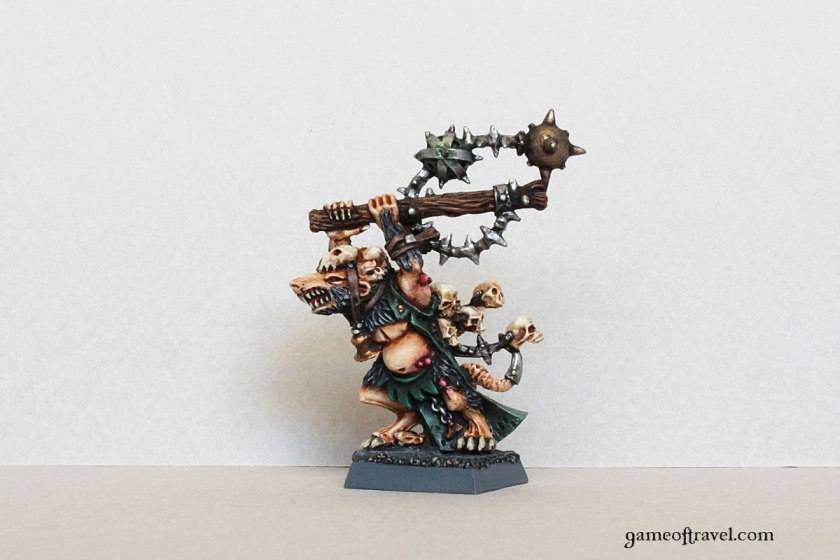
Skaven Plague Priest. ISO 100, Aperture F32, Shutter 1.3
Stable Camera. In Poland I used tripod and 2 seconds self timer. This is necessary, (with settings above) to get proper sharpness of the model. Without self timer and well stabilised camera, the picture will look blurry as hell – the camera is simply shaken during shutter release. So, right now, without tripod, I need to be more creative. Stable surface for camera and some small object for support the lens (cover for lens is doing fine here:) and I was ready for action:). Next – self timer. It’s not allowed to touch the camera while it shoots. It’s important, the camera is still 100%. Any, even slightest move, will distort photo. That’s why I use 2 seconds self timer.
So, camera is set, next thing to do – focus on miniature.
Focus. Piece of cake. I gently focus lens on the object, until the model looks sharp. No great philosophy here. Just skilled eye;).
Light. Oh, this is so tricky. With no chance for ‘white light’ lamp, I must rely on natural source of light at the moment. Sun, in equator area is bright and strong. Even, on cloudy days, it provides me superb conditions. Well, the best light is when the sun is in highest position – around noon (in other time of the day – the was too much blue on the picture. White colour was turning blue. At noon – and not blueish effect any more…). It’s really cool – no need for any lamp, when the sun is so bright! In Poland, I could only dream for sunlight like that!
Background. Actually, this is one of my difficulties while I travel. In Poland – one, cool, fancy lightbox. Big enough for any type of model I paint. Combined with my desk lamp and white background, it gave decent effects. Now – I had none of these. So, once again, I needed to arrange something from what I have in my backpack. And only few pieces of paper – that was all I got. At first, I made the background from two white cards of paper – and, well it did not work well. The white background had blueish tone, and therefore whole mini turned blue as well.

Distant Relative Jim for Wolsung. Blueish effect visible quite right.
White Balance set was not giving desired effect. While, in Poland worked for me perfectly, here, for unknown for me reasons, were turning blue. I know, it’s the matter of the light, but I did not have the clue, why it’s happening like that. I didn’t even try to figure out the problem, I just changed the paper for light grey. It it was bull’s eye. Th grey on the photo looks almost white. No sign of the blueish shade (but only with noon’s sun – in the afternoon, when light is way weaker – the grey colour also turned this forsaken blue…).

Sanguinary Priest fro Blood Angels. My first model painted on this trip. Grey background.
In fact, in my next photo, I try to use darker shade of grey background (almost black). Many people advise me to use dark background, to get better, more realistic colour representation od the picture. Will see.
Photoshop. OK. Photo taken….but, well…it’s not over yet. Miniature looks great – however everything looks little bit too dark. And, it should be. More work to be done in Photoshop. Adjust Curves, Levels, Contrast and Colour Balance. And add slight sharp filters. Mastering this program is the topic for whole article. It is not especially difficult. However it’s the matter of practice. The trick is is to turn darker, grey picture into more sharp, good looking – exposing details and colours of the model. There are many tutorials, how to use Photoshop on miniatures photos. Here’s one I like – link.
Generally, I’m satisfied with the results of my my manual settings during my next Asian trip. Photos are still sharp, and there’s no significant colour distortions. I’ve overcome white/blue balance issues and everything is rather so-so. Hard to say if it could be better. Of course I could have brought small tripod with me, but, trust me, there’s no empty space left in my backpack.
…and I will give a chance to darker background paper next time. We will see what happen.
So, next few months I’ll go like this. It’s nice that I can get decent photos at such amateur conditions and I can proceed with my hobby so far away from my home.
My photos look nice. However, there’s always room for progress. If I don’t get better, it means I’m stuck. And therefore – I do not to improve. And I can’t afford that…
And you? Anyone had experience of making miniatures photos away from home, with limited options? Any tips? Clues? What can I change and improve? Anybody? Help?
This is my last day in Bangkok. I was pretty sure I would have finished Blood Angels Tactical and Terminators squad, but…well…still lots of details to work on, but it’s getting close.
Next stop – Jakarta, where I plan to play another battle of Warhammer 40k. It tuned out, that it’s Wh40k game is the easiest to arrange anywhere I go (from all games I collect/play). I don’t mind. I like it:).
Until next time!

Nice post – good job figuring things out with the camera work. I’ve got the small light box and good lights. But I’ve been using my iPhone (6) to do nearly all the shots on my blog this year.
I use the “manual” app when I remember to do so – great controls and editing within the app.
I also typically post from the WordPress app – so having the photos in my phone is just a bonus.
Keep up the blog – always a good read.
-d
LikeLiked by 1 person
Nice one mate, I’m in awe of your dedication! I just snap on my iPhone – way too lazy 🙂
LikeLiked by 1 person
A very useful write-up – thanks! Have fun in Jakarta 😉
LikeLiked by 1 person
thanks!
LikeLike